Ratchet Straps 101: How to Secure Your Overland Load Like a Pro
Overlanding is all about freedom—hitting the open trail, tackling rough terrain, and camping under the stars. But nothing kills the vibe faster than a loose load rattling around your rig or, worse, flying off on a bumpy backroad. That’s where ratchet straps come in: the unsung heroes of overland gear. Whether you’re hauling a rooftop tent, spare tires, or a cooler full of supplies, knowing how to secure your load like a pro is non-negotiable. In this guide, we’ll walk you through the essentials of using ratchet straps for overlanding, step by step, so you can hit the trail with confidence.
At Venture Overland Company, we’ve seen firsthand how quality straps—like our Rhino USA ratchet straps—make all the difference. Let’s break it down and get you strapping like an expert.
Why Ratchet Straps Are Perfect for Overlanding
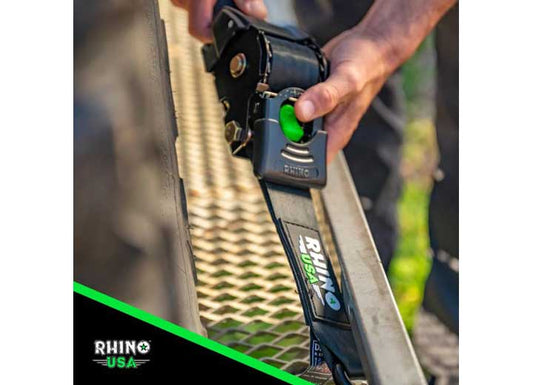
Ratchet straps aren’t just any tie-downs. They’re built for heavy-duty jobs, offering adjustable tension and brute strength that bungee cords or ropes can’t match. For overlanders, this means securing everything from jerry cans to kayaks on a rig bouncing over rocks and ruts. The ratchet mechanism lets you dial in the exact tightness you need, while durable webbing (like the polyester in Rhino USA straps) resists UV rays and abrasion from months on the trail. Plus, retractable designs save you the hassle of tangled messes—a win when you’re unpacking at dusk. If you’re serious about overlanding, ratchet straps are your go-to for load security.
Step-by-Step: Securing Your Overland Load Like a Pro
Ready to lock it down? Here’s how to use ratchet straps for overlanding in five straightforward steps.
Step 1: Choose the Right Strap
Not all ratchet straps are created equal. Check the weight capacity—your strap’s working load limit (WLL) should exceed the heaviest item you’re securing. A 1-inch strap might handle 500 lbs, while a 2-inch beast like the Rhino USA Heavy Duty can tackle 11,000 lbs breaking strength (with a safe WLL of about 3,600 lbs). Length matters too: a 20-foot strap gives you flexibility for rooftop cargo, while 8 feet works for smaller gear. Match the strap to your load, and you’re off to a solid start.
Step 2: Inspect Your Gear and Anchor Points
Before you strap anything, take a minute to scout your setup. Look for sturdy anchor points on your vehicle—roof racks, tie-down loops, or bed hooks. Avoid sharp edges that could fray the strap; if you spot any, use padding or edge guards. Check your gear too—loose items like fuel cans need to be grouped or boxed to avoid shifting. A quick inspection now prevents headaches (or worse) later.
Step 3: Secure the Load
Here’s the fun part. Thread the strap through the ratchet: pull the loose end through the slot, tug it snug, and crank the handle a few times to take up slack. Hook one end to an anchor point, drape the strap over your load, and attach the other end. Now, ratchet it tight—listen for that satisfying *click-click* as tension builds. Don’t overdo it; you want firm, not crushing. For odd-shaped loads (say, a spare tire), crisscross two straps for extra stability. Pro move: keep the strap flat, no twists, for even pressure.
Step 4: Test Stability on Rough Terrain
A load that feels secure in your driveway might loosen up on a washboard road. After strapping down, give your rig a gentle shake or take a short test drive (low speed, nearby loop). Watch for wobble or listen for rattles. If something shifts, hop out and re-tighten. Overlanding pros often stop after the first mile of rough trail to double-check—vibration loves to sneak things loose. Adjust as needed, and you’ll be golden.
Step 5: Maintain and Store Your Straps Post-Trip
Your ratchet straps are built tough, but they’re not invincible. After a trip, inspect them for cuts, frays, or rust on the ratchet mechanism. Clean off mud or sand with a damp cloth—grit can wear down webbing over time. For retractable straps like Rhino USA’s, let them air-dry fully before retracting to avoid mildew. Store them coiled or retracted in a dry gear bag, ready for the next adventure. A little TLC keeps them trail-ready for years.
Pro Tips for Ratchet Strap Mastery
Want to level up? Try these overlanding hacks:
- **Avoid Over-Tightening**: Too much tension can damage gear or strain anchor points. Tighten until snug, not warped.
- **Use Padding**: Slide foam or a towel under the strap where it crosses sharp corners—your webbing will thank you.
- **Double-Check Early**: Stop after your first mile on a bumpy trail to re-tension. It’s a habit that saves hassle.
- **Label Straps**: If you’ve got multiple lengths, mark them (e.g., “roof” or “bed”) for quick grabs on future trips.
- **Pair with Nets**: For small, loose items, combine straps with a cargo net for total control.
Why It Matters
A secure load isn’t just about convenience—it’s safety. A loose cooler can dent your tailgate; a flying tire can endanger others on the trail. In 2025, with overlanding booming (X posts are buzzing about epic trips), gear reliability is more critical than ever. Quality ratchet straps for overlanding—like those from Rhino USA—give you peace of mind, letting you focus on the journey, not the jostle.
Wrap-Up: Strap Up and Roll Out
Mastering ratchet straps is a game-changer for overlanders. With the right tools and know-how, you can secure your load like a pro, no matter where the trail takes you. From picking the perfect strap to testing it on the fly, these steps ensure your gear stays put and your adventure stays on track. Ready to upgrade your setup? Explore our Rhino USA ratchet straps at Venture Overland Company—built tough, shipped fast, and trusted by overlanders nationwide. Now, strap up and hit the dirt—your next epic trip awaits.


